
How To Schedule TikTok Posts (Step-By-Step Guide)
Want to learn how to schedule TikTok posts? You’re in the right place.
Scheduling TikTok posts ahead of time helps to keep things organized and can seriously streamline your workflow.
Instead of posting videos manually every day, you can get everything ready in one sitting, weeks in advance.
There are two ways to schedule TikTok posts. You can use TikTok’s native video scheduler or you can use a third-party scheduling tool like SocialBee.
In this post, I’ll walk you through both methods step-by-step. Let’s get started…
How to schedule TikTok posts with the Video Scheduler
If you want to schedule TikTok posts for free, you’ll need to use the TikTok Video Scheduler.
However, it has some major limitations. The biggest issue is that it only lets you schedule posts up to 30 days in advance.
If you want to schedule further ahead than that, you’ll need to use a third-party scheduler tool instead. We’ll show you how to do this later with SocialBee.
The other issue with the TikTok Video Scheduler is that it’s only available through your desktop web browser—you can’t use it on the mobile app.
It also lacks the advanced scheduling and automation features you get with SocialBee (more on this later).
With all that in mind, if you still want to use the TikTok Video Scheduler, here’s how to do it…
Note: You’ll need a TikTok Business account for this to work. To change to a Business account, click your Profile > Settings > Business account. Then, click the Business account toggle button.
Step 1: Record your video
Usually when you’re posting a TikTok video, you can record and edit it in the TikTok app from your smartphone.
Unfortunately, the TikTok Video Scheduler doesn’t work on mobile—it only works on desktop—so that’s not an option.
If you plan to record the video on your smartphone camera, you’ll need to do that first and then transfer the file over to your desktop to schedule it.
Another option is to make the video in the TikTok app on your smartphone like you normally would and then publish it as private and download it to your phone’s gallery, before moving it over to your desktop. That way you can still use all of TikTok’s video editing tools
Step 2: Log in to TikTok on your web browser
Next, open up TikTok in a web browser on your desktop device.

Then, click the Upload button in the sidebar to open up the web upload page.
Step 3: Upload your video
Next, click Select video or drag and drop the file you want to schedule onto the page to upload it.

Keep in mind that the video will need to be in the right format for TikTok, which means no longer than 10 minutes, no greater than 10 GB, and a resolution of at least 720×1280 (1080×1920 is recommended).
Step 4: Edit the video, description, and settings
Once your video is uploaded, you can make basic edits by clicking Edit video.

For example, you can add trending sounds from TikTok’s sound library, or add a template overlay.
After that, add your video caption, making sure to add any hashtags and @mentions you want to include.
You might also want to change the cover image, add a location, change the privacy settings, etc.
You can also click Show more to add content disclosure or AI-generated labels as needed and choose whether you want to allow other users to comment on, duet, or stitch your video.

Step 5: Choose when to post
Under When to post, click Schedule.
Then, use the drop-down menus to select the time and date you want the video to be published.
Note: The time you see here reflects the timezone in your computer settings. If you want to schedule your TikToks to go out at a specific time in another timezone, you’ll need to convert it first.

Remember that you can only schedule TikTok videos up to 30 days ahead. Dates after this will be greyed out in the menu so you can’t select them.
Once you’ve chosen a time and date, click Schedule and you’re done.
Step 6: Manage your scheduled posts
Go to your TikTok Studio and click Posts.

Here, you’ll see a list of all the TikTok videos you’ve scheduled alongside details like the time/date they’ll be posted.
Unfortunately, you can edit scheduled posts.
If you want to change a scheduled video, you’ll need to click Delete to remove it, and then start again. This is another one of the drawbacks of TikTok’s Video Scheduler.
How to schedule TikTok posts with SocialBee
If you want to schedule TikTok posts more than 30 days in advance, the best option is to use SocialBee.

It lets you plan posts as far ahead as you want and has a bunch of powerful features you don’t get with the native video scheduler, like category-based scheduling, AI strategy generation, and best time to post suggestions.
Plus, it supports other social media platforms too. So, you can plan, schedule, and publish posts on TikTok, YouTube, Facebook, Threads, Bluesky, Instagram, etc. from one centralized hub.
The only drawback is that it isn’t free, but if you’re serious about TikTok, it’s more than worth the small monthly subscription cost.
Here’s how to schedule TikTok posts with SocialBee…
Step 1: Log in to SocialBee
First, you’ll need to sign up for SocialBee and log in to your account.
There are a few subscription plans to choose from depending on your requirements, and you can get started for free with a 14-day trial.
Click here to activate your free trial of SocialBee.
Once you log in for the first time, you’ll be invited to connect your social media accounts.

Click the TikTok icon to connect TikTok, and do the same for any other profiles and pages you want to manage. You can connect multiple TikTok accounts if needed.
Step 2: Add a new post
Click the Add Post button at the top of your SocialBee dashboard to open up the post creator.

Select your TikTok account (as well as any other socials you want to schedule the post to) by clicking the relevant icon(s) at the top.
Then underneath, click Add a photo or video to upload your TikTok video, and write a caption in the text box (you can use the built-in AI assistant to generate captions and hashtags if you want).

Select who can view the video from the menu in the top-right corner of the text box. Below the text box, check the privacy option boxes to determine whether viewers are allowed to comment on, duet, or stitch it.
If you want to indicate that the video is promotional, you can click the Content disclosure toggle button.
You can also click the thumbnail icon to select a frame or upload an image as a custom thumbnail.
If you plan to post the video to other platforms aside from TikTok (like Instagram or Facebook), then you can add post variations to create unique variations for each network.
Step 3: Choose a posting time
Under When to post, click Add a posting time.

Then, select a time and date in the pop-up calendar.

Suggested times are highlighted in yellow. These are the times when your TikToks are most likely to get more views and engagements. They’re personalized to your audience and based on your historical post performance.
If you want to share the same video more than once, you can add multiple posting times. Just keep tapping the Add a posting time button and choosing more dates.
You also have the option of adding the post to a category, but we’ll come back to that later.
For now, click Save post, and you’re done. SocialBee will auto-publish the TikTok video at the time you set.
Step 4: View and manage scheduled posts
From your SocialBee dashboard, select Next Posts in the sidebar.

This will bring up a list of your upcoming 100 posts. You can switch between list view and calendar view (as well as grid preview view for Instagram).
Then, you can click on any scheduled post in the list/calendar to delete, edit, or publish it immediately.
Advanced TikTok scheduling tips and tricks
Now that we’ve covered the basics, I’m going to show you some advanced tips and tricks to help you save even more time and get your videos seen by as many people as possible.
Organize your videos into content categories
SocialBee lets you bucket TikTok videos together into logical content categories, and then create a consistent posting schedule based around those categories.
Trust me, this is a lot faster than scheduling posts individually one by one. And it also helps ensure you share a good mix of different types of videos.
First, click Content in the sidebar from the SocialBee dashboard. Then, click Create Category and add a new category.

Your categories can be anything. For example, you might have one for promotional posts, another for talking head videos, another for dance videos, and so on.
Once you’ve added all your categories, you can tap them, then click Add posts to this category to fill them with videos.

Set up a category-based posting schedule
Click on Scheduler from the sidebar to open up SocialBee’s content calendar.
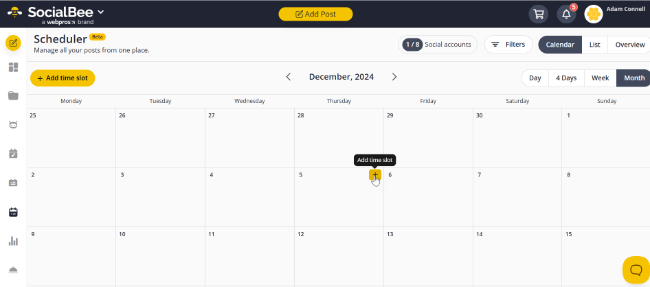
From here, we can set up a recurring TikTok posting schedule. First, click Add time slot on any date in the calendar.
Then, choose a post category, select a day of the week, pick a time, and click Save time slot.

Now, every week on that day at that time, SocialBee will publish a post from that content category.
This means you don’t have to keep scheduling posts individually every time you make a new video. You can just add it to the category, and it’ll be queued up automatically.
By default, the last post you add to a category is the first to get published, but you can change the order from the category settings page.
Recycle your evergreen content
A lot of the time, you might want to share the same TikTok video more than once.
In that case, you can use SocialBee’s post-recycling feature to automate the process.
When you schedule a post or add it to a category, simply click the Re-queue after posting toggle.

SocialBee will then automatically re-add the post to the back of the queue after it shares it so that it continues to be re-shared in an evergreen cycle until it expires.
And you can choose when you want the post to expire. Either set a specific date or set it to expire after a certain number of re-shares (e.g. 5).
Post at the right time for your audience
One of the best ways to get more views on TikTok is to make sure you’re posting at the right time.
Posting your video when your target audience is most active and likely to engage with it makes it more likely that it’ll rack up more views and engagements in that crucial first few hours.
And that creates a snowball effect. If the TikTok algorithm sees your video is performing well off the bat, it’ll push it out to even more viewers and it could end up going viral.
On the flip side, if you post a video at the wrong time, it won’t get the initial views and engagements it deserves, and it’ll flop.
Everyone’s target audience is different, so there’s no universal best time to post that’ll work for everyone.
However, SocialBee can work out your personal best time to post based on your historical performance data.
It’ll look at the videos you’ve shared on TikTok in the past to work out which time slots tend to do better, and which do worse, and then offer suggestions based on that.
But for this to work, you need to give it a lot of data to work with. So, it’s worth experimenting with lots of different posting times in your TikTok content calendar at the start while you gather that data.
Try to schedule at least 3 TikTok posts per week
To keep active on TikTok, I’d suggest aiming to schedule at least 3 posts every week. That’s a minimum benchmark, but the more the better.
TikTok actually recommends sharing 1-4 posts a day, which would be 7-28 per week. If you can manage that kind of posting frequency, go for it.
If you’re struggling to fill out your calendar, I’d recommend checking out my roundup of 20+ TikTok video ideas for inspiration.
Consider approval workflows
If you need to collaborate with other people on your TikTok post, it’s worth setting up an approval workflow.
For example, if you work with a team or assistant to create content, you can set up a system where any posts they create have to be manually approved by you (or your client, social media manager, etc) before they can get published.
On SocialBee, new posts you create can be set as Drafts or Approved.
If they’re set as Drafts, they can be scheduled but won’t be published until they’re set to Approved.
You can click Content > Content Approval to see a list of all drafted posts ready for you to review.
Don’t schedule too far ahead
On SocialBee, you could schedule posts a whole year ahead of time if you wanted to.
However, I wouldn’t recommend scheduling most of your TikTok content that far in advance.
Why? Because relevance is key.
TikTok thrives on fresh, timely, and trend-driven content, so scheduling too far ahead could result in missing out on current trends or using outdated formats that no longer resonate with your audience.
Instead, focus on creating a mix of evergreen content that can be scheduled far in advance, but still leave room for flexibility to adapt to emerging trends as they happen.
Regularly check your analytics
It’s always worth regularly checking your TikTok analytics to review how your videos have been performing.
Pay particular attention to which content categories and posting times have been doing well, and which ones have been underperforming.
Then, feed that back into your strategy. For example, you might want to change your content categories or amend your schedule to prioritize different times and days.
Conclusion
That concludes our complete guide to scheduling TikTok posts.
To recap, you can schedule posts using the TikTok Video Scheduler for free, but only up to 30 days in advance.
A better solution is to use SocialBee. It lets you schedule posts as far in advance as you want and to all your social media accounts in one place. And it has powerful features that you don’t get with the Video Scheduler, like category-based posting schedules and content recycling.
Want to learn more about TikTok? Check out these interesting TikTok statistics and see this comprehensive guide on how to make money on TikTok.
Related reading:
Disclosure: If you buy through links on our site, we may make a commission.